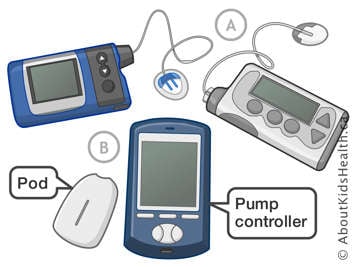
Insulin pumps continuously deliver insulin. Their formal name is continuous subcutaneous insulin infusion pump. The pump is about the size of a phone pager, and is worn on the belt or kept in a pocket. An insulin pump allows your child to get as much insulin as needed without having to get a new needle each time.
- How insulin pumps work
- What insulin regimens pumps allow
- Is an insulin pump right for my child?
- Concerns for specific age groups
-
Potential problems when using the insulin pump
How insulin pumps work
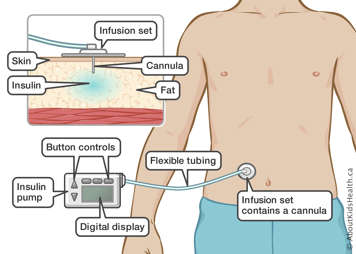
An insulin pump system is made of four main parts:
- a small cartridge of insulin called a reservoir
- a thin plastic tube (the cannula) that sits under the skin
- flexible plastic tubing that connects the cannula to the reservoir
- a pump which allows you to set and change the amount of insulin delivered.

The cannula within the infusion set is placed in the fat under your child’s skin with an infusion set insertion device. The insertion device pricks a needle through the skin. The needle brings with it the cannula. The infusion set insertion device is then removed along with the needle while the cannula stays in place within the infusion set. The infusion set must be replaced every two or three days.

The insulin is delivered from the reservoir to your child’s body through flexible tubing to the cannula. You must change the reservoir before it runs out.
The OmniPod System is another type of insulin pump with two distinct parts.
- The Pod device is placed on the skin. It contains the needle to insert the cannula, the cannula, and the refillable insulin reservoir.
- The pump controller is separated from the pod and can be carried elsewhere (in a pocket for example).
In this case, no visible tubing is needed because the cannula is directly connected to the insulin reservoir.
The buttons on the pump allow you to control the timing and dosage of insulin boluses. The device sounds an alarm if the tube is clogged or if the batteries are low.
What insulin regimens pumps allow
The pump holds a measured amount of rapid-acting insulin in a reservoir. The pump releases a set amount of insulin, the basal dose, throughout the day and night. The user tells the pump to release a surge of insulin, a bolus, just before each meal to balance the effect of the food. The bolus dose is calculated based upon the person’s blood glucose (sugar) level, the amount of carbohydrates in the meal, and the amount of rapid-acting insulin left over from the previous bolus. Users can change the amount of insulin based on their needs. For example, more insulin is needed during illness, and less is needed during periods of intense activity.
Is an insulin pump right for my child?
Many children with type 1 diabetes can benefit from an insulin pump.
Perfect control of diabetes is not a requirement for using the pump. Many children improve significantly their blood sugar control once they are using an insulin pump. Good candidates for the insulin pump also:
- come to clinic regularly
- are knowledgeable about diabetes
- are confident in carbohydrate counting
- are prepared to do eight to nine blood sugar tests per day, at least during the first few weeks
- have good attention to detail
- have good decision-making and problem-solving skills.
If you think that you and your child can learn to use the pump successfully, speak to your diabetes team.
Advantages of insulin pumps
Children and teens have started using insulin pumps for type 1 diabetes because of their many advantages.
- You can adjust and manage insulin levels more precisely, with careful and frequent monitoring. Insulin pumps allow you to more closely mimic the normal action of a healthy pancreas.
- Pumps can help your child achieve lower blood sugar (HbA1c) levels, with less fluctuation between “highs” and “lows”, and less risk of hyperglycemia and hypoglycemia.
- Your child only needs one prick of a needle about every three days to insert the new cannula. A push of a button delivers extra insulin when needed.
- The pump can be very liberating. Learning to use the pump is more work at first, but children then have much more freedom and flexibility to eat, sleep, and exercise when they want.
- Improved blood sugar control reduces the risk of complications down the road.
Disadvantages of insulin pumps
Because the pump delivers only rapid-acting insulin, there are no long-acting insulin reserves to fall back on if there is a problem. This means that blood sugar and ketone levels can rise very quickly if something goes wrong with the pump or the insertion site. Blood sugar levels must be monitored more often.
Having support to help a child re-insert a pump site or trouble-shooting a pump malfunction in a very small amount of time at school can be a challenge for many families.
Insulin pumps are expensive. Not all private health insurance plans will pay for pumps, and government subsidies for insulin pumps vary from province to province and patient to patient.
Some people find the pump is too noticeable—they do not want to be hooked up all the time and it may get in the way of physical activity. Others find it is a constant, unwanted reminder that they have diabetes.
Some children find that the needle hurts more, because it is a bit bigger than an ordinary needle for syringe. On the other hand, there is only one insertion of a needle every three days. The pump is only as good as the person who is running it. Anyone who is using the pump needs to be willing to make decisions and solve problems if they arise.
Concerns for specific age groups
Babies and toddlers
Babies and toddlers can be good candidates for the pump. Because they are with a caregiver all the time, it is almost as though the caregiver and not the child is wearing the pump. The caregiver can monitor the child easily and react quickly if there are any problems. All pumps have a feature that allows you to "lock out" the child to avoid children of this age to push buttons on the pump by accident.
School-aged children
Young school-aged children are often unable to check their own blood sugar level, calculate bolus doses, or remember to push the button on the pump before meals. Because they are away from home during the day, their parents cannot be there to monitor the situation.
Depending on the school, there may be limited support available for children with diabetes. However, many families find a way to support their child during school hours. It could be:
- having a nurse coming at key intervals to assist the youngest children
- having a teacher or another school employee help the child with pump-related activities.
To find a solution, discuss the possibilities with the school and the diabetes team.
Older children and teenagers
Preteens and teens are able to check their own blood sugar level and calculate bolus doses. They can take on more of the routine of using the pump. However, it is important for parents to stay involved. One option is to sit down together at the end of the day to review blood sugar readings and bolus doses. Parents and teens can use this time to discuss any problems that came up during the day and work on solving them.
Potential problems when using the insulin pump
Because the pump only provides rapid-acting insulin, blood sugar and ketones can rise very quickly if something goes wrong. It is important to check blood sugar regularly and address any problems quickly.
When using an insulin pump, you or your child should always carry:
- a blood sugar meter
- blood sugar test strips
- ketone test strips
- an insulin pen loaded with rapid-acting insulin, in case of pump failure
- an extra infusion set
- an extra insulin vial.
The most important factor is good family support. The parents and especially the child must be committed to making the pump work.
Potential insulin pump mechanical problems
The pump is a mechanical device and might break down. Problems may include:
- batteries running low (although pumps have an alarm to alert the wearer when batteries are running low or if the tube is clogged)
- a mechanical problem with the pump
- a break, clog or a kink in the tubing
- insulin in the tubing freezing during cold weather
- the cannula slipping out of the insertion site
- inflammation or infection at the insertion site, which make it harder to absorb insulin
- failure to be alerted about a low reservoir.
Troubleshooting insulin pump failure
If your child’s insulin pump malfunctions, diabetic ketoacidosis (DKA) can develop quickly. To rule out any other reason why your child may be ill, first make sure the pump is working. The illness could be caused by the pump not working properly.
- Check the bolus history to ensure the last bolus dose was given. If a bolus dose was omitted, give a correction bolus dose using the total daily dose (TDD).
- If your child’s insulin pump has tubing, check the tubing for air bubbles. If you find bubbles, remove the bubbles using the step-by-step commands on your insulin pump.
- Check infusion site for leakage, or a dislodged cannula to rule out mechanical issues. If you find a problem, insert a new infusion site and give a correction bolus using the guidelines in this chart .