G tubes: Balloon G tubes | G | G tubes: Balloon G tubes | G tubes: Balloon G tubes | | English | Gastrointestinal;Other | Child (0-12 years);Teen (13-18 years) | Abdomen;Stomach | Digestive system | Procedures | Adult (19+)
Caregivers | NA | | 2023-09-06T04:00:00Z | | | | | | 6.50000000000000 | 75.3000000000000 | 2843.00000000000 | | Health (A-Z) - Procedure | Health A-Z | <p>A balloon G tube is a type of feeding tube that has a balloon on the end to help prevent the tube from being accidentally pulled out. Learn how to care for your child’s balloon G tube and change it at home.</p> | <p>Gastrostomy tubes (G tubes) are feeding devices that provide liquid nutrition, medications, and other fluids directly into the stomach. G tubes are placed through a surgical opening in your child's abdomen (tummy) called a stoma. The tunnel from the outside into the stomach is called the tract. </p><p>Balloon G tubes have a balloon on the end that sits inside the stomach to keep the tube in place. These tubes may be non low-profile or low-profile. </p><p>This information in this article does not apply to GJ tubes, combination G/GJ tubes or non-balloon G tubes. </p><table class="akh-table"><tbody><tr><td>The SickKids G-Tube Feeding Program has developed a one page guide to help you quickly troubleshoot any issues with your child's feeding tube:
<a href="https://assets.aboutkidshealth.ca/AKHAssets/G%20Tube%20Feeding%20Program%20-%20Family%20One%20Pager.pdf" target="_blank">G-Tube Feeding Program Family One Pager</a></td></tr></tbody></table> | <h2>Key points </h2><ul><li>A balloon G tube is a type of feeding tube that has a balloon on the end that sits inside the stomach to prevent it from being pulled out. </li><li>A non low-profile balloon G tube extends further out of the stomach and has a disk on the outside to keep the tube from moving too far into the stomach. </li><li>A low-profile balloon G tube sits close to the skin and is easy to conceal. </li><li>Balloon G tubes should be changed at least every six to eight months to prevent the balloon from leaking or breaking, which can cause the G tube to accidentally fall out. </li><li>The G tube feeding extension set should be changed every month. </li><li>Whenever you change or re-insert a G tube, always check the pH of the fluids that come from the tube to make sure it is in the stomach before using it for feeds and medications. </li><li>You do not need to go to the emergency department if your child’s balloon is broken, blocked, or the tube accidentally falls out, and you are able to replace the tube or insert a Foley catheter. </li><li>You will only need to go the emergency department if you cannot insert a replacement tube or an emergency Foley catheter and there is nothing in the tract. </li></ul> | | | | | <h2>What to do if your child’s balloon G tube is pulled out or becomes blocked</h2><h3>If the tube is accidentally pulled out</h3><p>It is possible that the G tube may accidentally fall out or be pulled out. This may happen if the balloon is broken or does not have enough water in it. </p><p>To check if the balloon is broken, fill it with 5 mL of water. If you do not see a leak, remove the water from the balloon, wash the G tube with soap and water and reinsert it into the stoma as described above. Fill the balloon with the amount of water you normally use. Check the balloon every two to three days to be sure there are no further problems. </p><p>If the balloon is broken, replace it with a new tube as described above. </p>
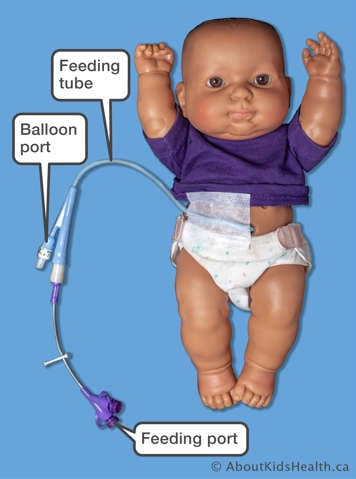
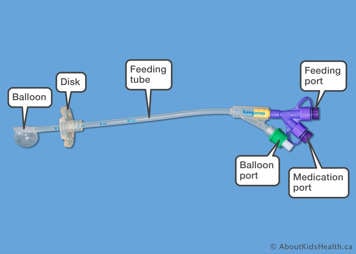
<figure><span class="asset-image-title">Foley catheter</span><img src="https://assets.aboutkidshealth.ca/AKHAssets/GTubes_FoleyCatheter.jpg" alt="Foley catheter showing feeding tube, feeding port, balloon port and balloon" /> </figure>
<p>If you cannot replace the G tube, insert a temporary Foley catheter. To learn how to insert the Foley catheter, please see the article "<a href="/Article?contentid=2910&language=English">What to do if your child’s feeding tube is pulled out</a>". You can use the Foley catheter for feeds and medication until a new G tube is inserted if placement is confirmed by checking the pH. </p><p>Remember to always carry an emergency kit that includes: </p><ul><li>Back-up balloon G tube or Foley catheter </li><li>Water-based lubricant gel </li><li>Slip tip syringes </li><li>Water </li><li>pH strips and colour reference guide </li><li>Tape in case of unexpected tube changes </li><li>Kangaroo extension </li></ul><p><strong>You do not need to go to the emergency department if the tube falls out or becomes blocked and you replace the tube or insert a Foley catheter.</strong> You will only need to go the emergency department if you cannot insert a Foley catheter and there is nothing in the tract, or if after inserting a Foley catheter, you cannot verify that it is in the stomach. </p><h3>If the tube becomes blocked</h3><p>To learn what to do if your child’s G tube becomes blocked, please see the article "<a href="/Article?contentid=3039&language=English">What to do if your child’s feeding tube is blocked</a>".<br></p><h3>G tube migration</h3><p>Balloon G tubes such as Foley catheters are at high risk of migrating from the stomach into the small bowel. The tube must be secured to the abdomen with tape to prevent tube migration. </p><p>Signs and symptoms of G tube migration include: </p><ul><li>Increased vomiting </li><li>Gagging and retching </li><li>Abdominal discomfort or pain </li><li>Bloated stomach </li><li>Diarrhea </li></ul><p>If you are concerned that your child’s Foley catheter feeding tube has migrated, gently pull back on the tube until you feel the balloon against the stomach wall. Tape the tube in place in this position. If these signs and symptoms continue or you are concerned about your child, stop using the tube and contact your G tube specialist during regular business hours or go to the emergency department. </p> | | | | | | | | | | <h2>Caring for your child’s balloon G tube</h2><p>Keep the tube and stoma as dry and clean as possible, washing with soap and water daily. Your child’s stoma will not need a dressing. </p><p>Flush the tube with at least 5 to 10 mL of water before and after each feed and medication dose, and every four hours during continuous feeds. This helps prevent the tube from becoming blocked. </p><h3>The balloon</h3>
<figure>
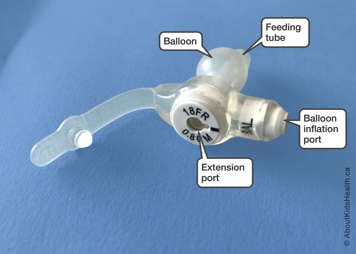
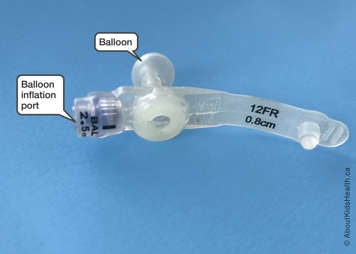
<span class="asset-image-title">Balloon port</span><img src="https://assets.aboutkidshealth.ca/akhassets/Gtube_balloonport_labels.jpg" alt="Balloon and balloon inflation port at the end of a G tube" /> </figure>
<p>The balloon at the end of your child’s tube is what keeps the tube in place and prevents it from being accidentally pulled out. The balloon is inflated with sterile or distilled water. You may also use tap water that has been boiled and cooled down. The water is inserted through the hard plastic port, which may be marked "BAL". Do not fill the balloon with saline or air. Do not give feeds into the balloon port. </p><p>The doctor who inserts the tube may fill the balloon with less than the recommended balloon volume. If this is the case, you will need guidance from your health-care team before you increase the balloon volume. </p><p>If you are unsure how much water your child’s balloon tube can safely hold or you are not sure how much water the balloon was originally filled with, ask your G tube specialist (at SickKids this is the G Tube Resource Nurse) or refer to the chart below. </p><table class="akh-table"><thead><tr><th> </th><th colspan="2">Non-low profile<br></th><th colspan="2">Low-profile</th></tr></thead><tbody><tr><td></td><td>Mic-G</td><td>Kangaroo</td><td>Mic-Key</td><td>AMT miniONE</td></tr><tr><td>12FR</td><td>3 to 5 mL (max 7 mL)</td><td>5 mL</td><td>3 to 5 mL</td><td>2 to 3 mL</td></tr><tr><td>14FR</td><td>3 to 5 mL (max 7 mL)</td><td>5 mL</td><td>5 to 10 mL</td><td>3 to 5 mL</td></tr></tbody></table><h3>Checking the volume of water in the balloon<br></h3><div class="asset-video">
<iframe src="https://www.youtube.com/embed/f0s7WSF_6pw?rel=0" frameborder="0"></iframe> </div><p>It is important to check the amount of water in the balloon at least once a week. This will help you to know if there is a problem with the balloon. Use a slip-tip syringe to check the balloon.</p><ol><li>Insert an empty syringe into the balloon port.</li><li>Remove all the water from the balloon. Throw away the old water. It is normal for the water to become discoloured (brown or yellow). </li><li>Re-inflate the balloon with new sterile or distilled water.</li></ol><p>It is normal for less water to be removed from the balloon than you originally put in. This is because some of the water might have evaporated. It is normal for there to be a difference of up to 0.5 mL. </p><p>If there is a difference of more than 0.5 mL of water from what you put in and what you remove, the balloon may be damaged, and the tube may need to be replaced. If this happens: </p><ul><li>Re-inflate the balloon with the amount of water you normally put in and check the volume again in three to four hours. </li><li>If you get all the water back, the water may have simply evaporated quicker than usual. Re-inflate the balloon with the amount of water you normally put in and check the balloon volume every three to four days to be sure there are no further problems. </li><li>If you get less water back again after three to four hours, the balloon is likely damaged, and the tube will need to be replaced. </li><li>If you get more fluid than what you originally put in the balloon, and it looks like stomach contents or food, this means the balloon is broken and the tube will need to be replaced. </li></ul><p>If the balloon is broken, there is a risk that the tube may be accidentally pulled out. Tape the tube in place to the abdomen until you can change the tube yourself or book an appointment with your G tube specialist to help you change the tube. </p><p>Meanwhile, the tube is still in the stomach so you can continue to use the tube for feeding and medications. There is no need to go the emergency department if the balloon is broken.</p><h3>Fit of balloon tube </h3><p>For low profile balloon tubes, filling the balloon with more or less water can affect the fit of the tube to the skin. Leaking and stoma issues may occur if the tube does not fit properly. Less water in the balloon makes the tube sit looser and stick out from the skin. More water in the balloon makes the tube sit tighter and closer to the skin. </p><h3>Adjusting the balloon for a tighter/looser fit </h3><p>If the tube is so tight you can see an indent in your child’s skin, you can decrease the amount of water in the balloon.</p><p>If the tube sticks out too much and is dangling from the stoma or leaking, increase the amount of water in the balloon. If adjusting the balloon volume does not help with the fit of your child’s tube, you may need to have the tract re-measured by your G tube specialist.</p><p>For non low-profile balloon tubes, the retention disk may be adjusted to manage the fit of the tube. Ensure the balloon is in a good position against the stomach wall before adjusting the disk. You can achieve this by pulling the tube upward until you feel resistance, which represents the balloon against the stomach wall. You can then slide the retention disk down the tube shaft, flush against the abdominal wall. </p><h2>Feeding extension set for a low-profile balloon G tube</h2><div class="asset-video">
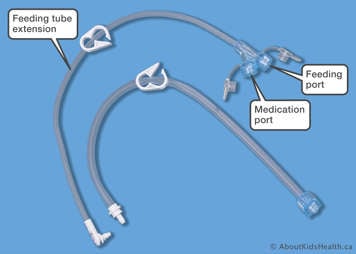
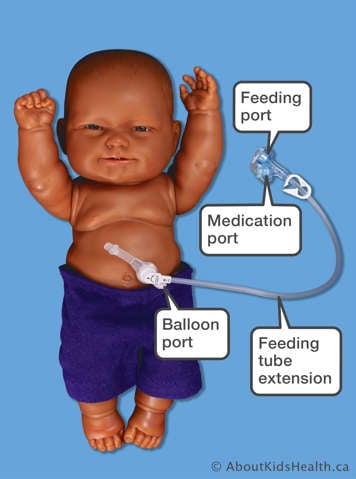
<iframe src="https://www.youtube.com/embed/nhrbisdk_zQ?rel=0" frameborder="0"></iframe> </div><p>The feeding port for a low-profile balloon G tube is where your child’s feeds will enter the tube and then go into their stomach. The feeding port has a one-way valve to prevent stomach contents, feeds, water, and medications from flowing back out of the tube. To open this one-way valve, and give feeds and medications, you must use a feeding extension set. Each brand of a low-profile balloon G tube has their own extension set. You will receive one in the box with a newly purchased low-profile balloon G tube. Replacement extension sets are purchased separately when needed. </p><div class="asset-2-up">
<figure>
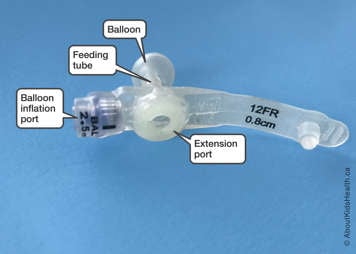
<span class="asset-image-title">Extension set detached from tube</span><img src="https://assets.aboutkidshealth.ca/AKHAssets/Gtube_extensionset_separate_labels.jpg" alt="Parts of an extension set detached from G tube" /> </figure>
<figure>
<span class="asset-image-title">Extension set attached to tube</span><img src="https://assets.aboutkidshealth.ca/AKHAssets/Gtube_extensionset_attached_labels.jpg" alt="Parts of an extension set attached to G tube" /> </figure> </div><h3>Connecting the extension set to the tube</h3><ol><li>Open the plastic cover on the feeding tube. </li><li>Make sure the clamp on the extension set is closed. </li><li>Match the line on the extension to the line on the tube and push the extension into the valve. </li><li>Holding the button tube in place, turn the extension clockwise until you feel the extension lock into place. There is an arrow on the extension to show you which direction to turn it. </li><li>Attach your feeds, fluids, and medications to the appropriate port at the end and open the clamp. </li><li>When you have finished using the extension, flush it and remove it from the tube.</li></ol><h3>Removing the extension from the tube</h3><ol><li>Clamp the extension. </li><li>Holding the tube in place, turn the extension counter clockwise (opposite to the arrow on the extension). </li><li>Match the line on the extension to the line on the tube and remove the extension. </li><li>Close the plastic cover on the feeding tube. </li></ol><p>The extension set should be changed once every month, or if you notice the plastic is becoming stiff or there is formula, food or medications built up inside. It is important to flush the extension set with water between each use and clean it with soap and water once daily. Remove the extension set from the tube when it is not in use to prevent pulling. </p> | <h2>How to change the balloon G tube<br></h2><p>
<strong>
<a href="/article?contentid=3886&language=english&hub=tubefeeding">Primary balloon G tubes</a> (i.e., surgical tubes) should not be changed in the first 8 weeks from insertion. These instructions do not apply to GJ tubes or combination G/GJ tubes.</strong></p><div class="asset-video">
<iframe src="https://www.youtube.com/embed/XhPb9UdJqK0?rel=0" frameborder="0"></iframe> <br></div><h3>Supplies</h3><ul><li>New balloon G tube</li><li>Soap</li><li>Warm water<br></li><li>Washcloth</li><li>Sterile or distilled water</li><li>Five syringes (two 5-mL slip tip syringes and three syringes that fit the feeding extension – either slip tip or ENFit) </li><li>Water-based lubricant or jelly</li><li>Feeding extension set (for low-profile G tubes)</li><li>pH strips and colour reference guide</li></ul><h3>Procedure</h3><ol><li>Wash your hands with soap and water and prepare your equipment and supplies. </li><li>Into one slip tip syringe, draw up the amount of water recommended by your health-care team to fill the balloon of your child’s tube. Draw 5 mL of water into another syringe that fits the feeding extension to flush the tube. Leave the other three syringes empty. You will use these to remove the old water from the balloon and check the pH. </li><li>Prepare your washcloth with soap and water on one half of the cloth and non-soapy water on another part. </li><li>Confirm the placement of the balloon G tube by checking the pH of the gastric contents, as described below. This will give a baseline assessment for gastric aspirate before removing the G tube. </li><li>Remove the sterile or distilled water from the balloon of the old G tube using one of the empty slip tip syringes. Throw the water and syringe away. </li><li>Remove the old G tube. It is normal for the inner part of the tube to be brown or black. This is caused by acidic stomach contents. Throw away the old tube.</li><li>This is a great time to assess the stoma for any changes, such as redness, drainage, rash, or hypergranulation tissue. Wash the stoma with soap and water and rinse it with non-soapy water. Then let it air dry. </li><li>Lubricate the tip of the new balloon G tube and, at a slight angle, insert it into the stoma, following the existing tract. The tube may be slightly resistant, so it is OK to exert light force. Try to time insertion with when your child breaths in, as they are most relaxed at that time. </li><li>Once the tube is in place, check that the tube is in the stomach by checking the pH as described below. The tube is in the stomach if you get a pH of less than 6.0 and/or the appearance of the gastric contents is similar to the gastric contents from pre-procedure. </li><li>Once you know that the tube is in the stomach, inflate the balloon with the amount of sterile or distilled water you usually put in. </li><li>For non low-profile balloon tubes, gently pull the tube until you feel resistance. This indicates that the balloon has reached the inside of the stomach wall. Adjust the outer disk so that it sits snug against the skin. </li><li>Flush the tube with 5 mL of water. If your child has a low-profile tube you can use the feeding extension to do this. </li><li>You may now use the tube for feeding and medications. </li></ol><h2>Checking that the newly changed balloon tube is in the right spot</h2><p>Before inflating the balloon, flushing the tube, or using the newly changed tubes for feeds and medications, you will need to check that it is in the stomach by checking the pH of the contents that are pulled from the tube. </p><h3>How to check the pH</h3><p>You will need:</p><ul><li>One empty slip tip syringe</li><li>The feeding extension set for a low-profile balloon G tube</li><li>pH strips</li><li>pH colour reference guide</li></ul><p>What to do:</p><ol><li>Once you have inserted the new tube, insert the empty syringe into the feeding extension feeding (for a low-profile balloon G tube) or directly into the tube’s feeding port and pull back a small amount of stomach contents. If you cannot get stomach contents, move your child side to side or sit them up while holding the tube in place. </li><li>Empty the stomach contents from the syringe onto the pH strip. </li><li>Compare the colours on the pH strip to the colours on the reference guide. </li></ol><p>
<strong>If the pH is less than 6.0</strong>, this means the tube is in the stomach and you can flush the tube and use it for feeding and medications.</p><p>
<strong>If the pH is 6.0 or higher</strong>the tube may not be in the stomach. Medications and recent feedings can affect the pH. If your child recently had medications or feeds and their stomach contents look like the photos in the video, you may continue to use the tube.
<strong>If you get a high reading and your child has not had recent feeds or medications, do not use the tube and check the pH again one hour later. </strong> If the reading is still 6.0 or higher, do not use the tube and contact your G tube specialist during business hours or go to the Emergency Department after hours to have the position checked by fluoroscopy.t. In the meantime, you can tape your child’s tube to their stomach as shown in the photo above. </p> | | | | <h2>Resources</h2><p>For more information about the Mic-Key, visit
<a href="https://www.mic-key.com/">www.mic-key.com</a>.</p><p>For more information about the AMT miniONE, visit
<a href="https://www.appliedmedical.net/enteral/minione/balloon/">www.appliedmedical.net/enteral/minione/balloon/</a>.</p> | | | | | |
انابيب الفُغْر المَعِديّة/الأنابيب المَعِديّة المِعويّة انابيب الفُغْر المَعِديّة المزودة ببالون | ا | انابيب الفُغْر المَعِديّة/الأنابيب المَعِديّة المِعويّة انابيب الفُغْر المَعِديّة المزودة ببالون | G/GJ tubes: Balloon G tubes | | Arabic | Gastrointestinal;Other | Child (0-12 years);Teen (13-18 years) | Abdomen;Stomach | Digestive system | Procedures | Adult (19+)
Caregivers | NA | | 2019-10-25T04:00:00Z | | | | | | 6.50000000000000 | 75.3000000000000 | 2843.00000000000 | | Flat Content | Health A-Z | <p>أنبوب الفُغْر المَعِدي المزود ببالون هو نوع من أنابيب التغذية الذي يحتوي في نهايته على بالون للمساعدة في منع سحب الأنبوب بطريق الخطأ. تعلم كيف تعتني بأنبوب الفُغْر المَعِدي المزود ببالون الخاص بطفلك وتغييره في المنزل.</p> | <p>أنابيب الفُغْر المَعِديّة هي عبارة عن أجهزة تغذية تزود المعدة بالتغذية السائلة والأدوية والسوائل الأخرى مباشرة في المعدة. توضع أنابيب الفُغْر المَعِديّة من خلال فتحة جراحية في بطن الطفل وتسمى فغر المعدة تسمى القناة من الخارج إلى المعدة المجرى.
تحتوي أنابيب الفُغْر المَعِديّة المزودة ببالون على بالون في نهاية الأنبوب داخل المعدة للحفاظ على البالون في مكانه قد تكون هذه الأنابيب بارزة أو غير بارزة.</p> | <h2>النقاط الرئيسية</h2><ul><li>أنبوب الفُغْر المَعِدي المزود ببالون هو نوع من أنابيب التغذية الذي يحتوي في نهايته على بالون داخل المعدة لمنع سحبه.</li><li>يمتد أنبوب الفُغْر المَعِدي المزود ببالون غير البارز إلى خارج المعدة ويحتوي على قرص في الخارج لمنع الأنبوب من التحرك بعيدًا عن المعدة. أما أنبوب الفُغْر المَعِدي المزود ببالون البارز فيوضع قريبًا من الجلد ومن السهل إخفاؤه.</li><li>يجب تغيير أنابيب الفُغْر المَعِديّة المزودة ببالون كل ستة إلى ثمانية أشهر على الأقل لمنع التسرُّب من البالون أو تلفه مما قد يؤدي إلى انزلاق أنبوب الفُغْر المَعِدي عن طريق الخطأ.</li><li>ويجب تغيير وصلة التغذية لأنبوب الفُغْر المَعِدي المخصص للتغذية كل شهر.</li><li>في أي وقت تقوم بتغيير أو إعادة إدخال أنبوب الفُغْر المَعِدي قبل استخدامه للأغذية والأدوية، تحقق دائمًا من درجة الحموضة للسوائل التي تأتي من الأنبوب للتأكد من وجوده في المعدة.</li><li>انت لست بحاجة إلى الذهاب إلى قسم الطوارئ إذا كان بالون طفلك تالفًا أو مسدودًا أو إذا سقط الأنبوب عن طريق الخطأ واستبدلت الأنبوب أو أدخلت أنبوب قسطرة فولي. سوف تحتاج فقط للذهاب إلى قسم الطوارئ إذا لم تتمكن من إدخال انبوب قسطرة فولي الطارئة ولا يوجد شيء في المجرى.</li></ul> | | | | | | | | | | | | | | | | | | | | <h2>المصادر</h2><p>لمزيد من المعلومات حول Mic-Key، تفضل بزيارة <a href="https://www.mic-key.com/">www.mic-key.com</a>.</p><p>لمزيد من المعلومات حول AMT miniONE، تفضل بزيارة <a href="https://www.appliedmedical.net/enteral/minione/balloon/">www.appliedmedical.net/enteral/minione/balloon/</a>.</p> | | | | | |
胃造口饲管(G管)/胃空肠造口饲管(GJ管):气囊型胃造口饲管(气囊型G管) | 胃 | 胃造口饲管(G管)/胃空肠造口饲管(GJ管):气囊型胃造口饲管(气囊型G管) | G/GJ tubes: Balloon G tubes | | ChineseSimplified | Gastrointestinal;Other | Child (0-12 years);Teen (13-18 years) | Abdomen;Stomach | Digestive system | Procedures | Adult (19+)
Caregivers | NA | | 2019-10-25T04:00:00Z | | | | | | 6.50000000000000 | 75.3000000000000 | 2843.00000000000 | | Flat Content | Health A-Z | <p>气囊型G管是一种饲管,一端有个气囊,可以防止不小心将饲管拔出体外。学会如何护理好孩子的气囊型G管,如何在家为孩子更换。</p> | <p>胃造口饲管(G管)是喂食器具,将营养液、药物和其他液体直接注入胃中。G管通过在您孩子的肚子(腹部)上做手术开口(称为胃造口)放入。从外部进入胃中的通道就叫做瘘管。</p><p>气囊型G管在胃中的那端有一个气囊,以保持饲管的位置不动。饲管可以是非超短型的,也可以是超短型的。</p> | <h2>要点</h2><ul><li>气囊型G管是一种饲管,深入胃里的一端有个气囊,可以防止将饲管拔出体外。</li><li>非超短型气囊型G管伸出胃部较长,外部有个圆盘,可以保证不让饲管过度深入胃部。超短型气囊型G管贴在皮肤上,容易掩盖。</li><li>气囊型G管应该至少每六至八个月更换一次,以免气囊破裂,造成G管意外脱落。</li><li>G管喂食延长管组件应该每月更换。</li><li>每一次更换或重新插入G管之后,在用它喂食或给药之前,切记检查从饲管中流出的液体的pH值,以确保饲管是在胃中。</li><li>如果孩子的气囊破裂、堵塞,或者在更换饲管、插入Foley导管时,饲管意外脱落,您无须前往急诊部。只有在您无法插入应急Foley导管和瘘管中空时,您才需要前往急诊部。</li></ul> | | | | | | | | | | | | | | | | | | | | <h2>有关资料</h2><p>有关Mic-Key的更多信息,请查询<a href="https://www.mic-key.com/">www.mic-key.com</a>.</p><p>有关AMT miniONE的更多信息,请查询<a href="https://www.appliedmedical.net/enteral/minione/balloon/">www.appliedmedical.net/enteral/minione/balloon/</a>.</p> | | | | | |
Sondes gastriques (G) et sondes gastrojéjunales (GJ) : sondes G à ballonnet | S | Sondes gastriques (G) et sondes gastrojéjunales (GJ) : sondes G à ballonnet | G/GJ tubes: Balloon G tubes | | French | Gastrointestinal;Other | Child (0-12 years);Teen (13-18 years) | Stomach;Abdomen;Small Intestine | Digestive system | Procedures | Adult (19+)
Caregivers | NA | | 2018-10-25T04:00:00Z | | | | | | | | | | Health (A-Z) - Procedure | Health A-Z | <p>La sonde G à ballonnet est une sonde alimentaire comportant un ballonnet à son extrémité afin d’éviter qu’elle soit retirée de manière accidentelle. Apprenez à prendre soin de la sonde G de votre enfant et à la changer.</p> | <p>Les sondes G sont des dispositifs d’alimentation qui permettent d’administrer des aliments liquides, des médicaments et des liquides directement dans l’estomac. On les met en place en pratiquant une ouverture (stomie) au moyen d’une intervention chirurgicale dans l’abdomen de l’enfant. Nous appelons « tube » le tunnel ainsi formé depuis l’extérieur jusque dans l’estomac.</p><p>Les sondes G à ballonnet comportent à l’extrémité d’un raccord un ballonnet qui se trouve dans l’estomac afin de garder la sonde en place. Ces sondes peuvent être de type discret ou non.</p> | <h2>À retenir</h2><ul><li>La sonde G à ballonnet est une sonde alimentaire comportant à son extrémité un ballonnet placé dans l’estomac afin d’éviter qu’elle ne soit retirée de manière accidentelle.</li><li>La sonde G à ballonnet de type non discret se prolonge hors de l’estomac et comporte un disque à l’extérieur pour l’empêcher de pénétrer trop profondément dans l’estomac. La sonde G discrète affleure la peau et peut être facilement dissimulée.</li><li>Il faut remplacer les sondes G à ballonnet au moins tous les six à huit mois pour éviter que des fuites du ballonnet ne provoquent leur retrait accidentel.</li><li>L’assortiment de rallonges pour l’alimentation de la sonde G doit être remplacé tous les mois.</li><li>Lors du remplacement d’une sonde G ou de sa réinsertion, et avant de l’utiliser pour l’alimentation ou l’administration de médicaments, il convient de toujours vérifier le pH des liquides qui proviennent de la sonde afin de s’assurer que celle-ci se trouve bien dans l’estomac.</li><li>Vous n’avez pas besoin de vous rendre au service des urgences en cas de bris ou de blocage du ballonnet ou si la sonde tombe par accident et qu’il vous faut la remettre en place ou introduire un cathéter de Foley. Le seul cas où vous devrez vous y rendre, c’est celui où vous êtes incapable d’introduire d’urgence un cathéter de Foley et que le tube est vide.<br></li></ul> | | | | | <h2>Ce qu’il faut faire si la sonde G à ballonnet de votre enfant est retirée ou se bouche
</h2><h3>En cas de retrait accidentel de la sonde</h3><p>Il est possible que la sonde G soit retirée par accident ou qu’elle tombe. C’est ce qui peut arriver si le ballonnet est endommagé ou qu’il ne contient pas suffisamment d’eau.</p><p>Afin de vérifier si le ballonnet est endommagé, ajoutez-lui 5 ml d’eau. Si vous n’observez aucune fuite, retirez l’eau du ballonnet et nettoyez la sonde G à l’eau et au savon. Réintroduisez-la ensuite dans la stomie comme le suggère la description donnée ci-dessus. Versez dans le ballonnet la quantité d’eau habituellement utilisée. Vérifiez-le tous les deux ou trois jours pour vous assurer qu’il n’y aura plus de problèmes.</p><p>Si le ballonnet est endommagé, remplacez-le et installez-le accompagné d’une nouvelle sonde comme on le décrit ci-dessus.</p><p>Si vous ne pouvez pas remplacer la sonde G, utilisez temporairement un cathéter de Foley. Pour savoir comment introduire celui-ci, veuillez lire l’article « <a href="/Article?contentid=2910&language=English">What to do if your child’s feeding tube is pulled out</a>». Vous pouvez utiliser le cathéter de Foley pour l’alimentation et l’administration de médicaments jusqu’à ce qu’une nouvelle sonde G soit introduite.</p><h3>En cas de blocage de la sonde</h3><p>Pour savoir ce qu’il faut faire lorsque la sonde G se bouche, veuillez lire l’article « <a href="/Article?contentid=3039&language=French">Sondes gastriques (G) ou gastrojéjunales (GJ) : quoi faire si la sonde d’alimentation est bouchée</a> ». Rappelez-vous de toujours garder avec vous une trousse de secours qui contient ce qui suit :</p><ul><li>Une sonde G ou un cathéter de Foley de sauvegarde
</li><li>Un lubrifiant à base d’eau ou un hydrogel</li><li>Des seringues</li><li>De l’eau</li><li>Des bandelettes indicatrices de pH et un guide de référence des couleurs</li><li>Du ruban adhésif en cas de changements inattendus dans la sonde</li></ul><p>Vous n’avez pas à vous rendre au service des urgences si la sonde tombe ou qu’elle se bouche et que vous la remplacez ou vous vous servez d’un cathéter de Foley. Il n’est nécessaire de vous y rendre que si vous êtes incapable d’introduire un cathéter de Foley et que le tube est vide.</p> | | | | | | | | | | <h2>Les soins à apporter à la sonde G à ballonnet de votre enfant</h2><p>Prenez soin de garder la sonde et la stomie aussi propres et secs que possible, en les nettoyant chaque jour à l’eau et au savon. La stomie ne nécessite aucun pansement.</p><p>Rincez la sonde en utilisant au moins 5 à 10 ml d’eau avant et après chaque repas et administration de médicaments et toutes les quatre heures pendant les séances d’alimentation continue. Ces précautions ont pour but de prévenir le blocage.</p><h3>Le ballonnet</h3><p>Le ballonnet à l’extrémité de la sonde a pour but de la garder en place et de prévenir son retrait accidentel de l’estomac. Il contient de l’eau stérile ou distillée qui a été versée par l’orifice du ballonnet sur lequel est inscrit « BAL ». Ne le remplissez pas d’air ni d’eau saline. N’utilisez pas l’orifice du ballonnet pour l’alimentation. Si vous ignorez la quantité exacte d’eau qu’il doit contenir, informez-vous auprès de l’expert des sondes G (à l’hôpital SickKids, notre infirmier-ressource pour les sondes G joue ce rôle) ou reportez-vous au tableau ci-dessous.</p><table class="akh-table"><thead><tr><th> </th><th colspan="2">Type non discret</th><th colspan="2">Type discret</th></tr></thead><tbody><tr><td></td><td>Mic-G</td><td>Kangaroo</td><td>Mic-Key</td><td>AMT miniONE</td></tr><tr><td>12 Ch</td><td>De 3 à 5 ml (max 7 ml)</td><td>5ml</td><td>De 3 à 5 ml</td><td>De 2 à 3 ml</td></tr><tr><td>14 Ch</td><td>De 3 à 5 ml (max 7 ml)</td><td>5ml</td><td>De 5 à 10 ml</td><td>De 4 à 5 ml</td></tr></tbody></table><p>Un volume d’eau supérieur ou inférieur à celui indiqué pour le ballonnet nuira à l’adaptation de la sonde au site d’insertion. Un volume inférieur diminuera la tension sur la sonde qui aura tendance à sortir de l’estomac. Un volume supérieur aura l’effet inverse en rapprochant la sonde de la peau et en augmentant la tension. Si vous observez sur la peau une marque indiquant une trop forte pression, vous pouvez réduire la quantité d’eau contenue dans le ballonnet. Si la sonde visible à l’extérieur est trop longue et qu’elle pend, vous pouvez augmenter la quantité d’eau. Dans le cas où les modifications apportées ne sont d’aucun secours, vous pouvez demander à l’expert des sondes G de mesurer de nouveau la sonde.</p><p>Il est important de vérifier la quantité d’eau que contient la sonde au moins une fois par semaine. Il sera également plus facile de détecter un problème quelconque avec le ballonnet. Vous pouvez utiliser une seringue à embout glissant à cette fin.</p><ol><li>Introduisez une seringue vide dans l’orifice du ballonnet.</li><li>Drainez complètement le ballonnet. Jetez l’eau qu’il contient. Il est normal qu’elle soit trouble (de couleur jaune ou brune).</li><li>Gonflez de nouveau le ballonnet en le remplissant d’eau distillée ou stérile.</li></ol><p>Il est normal que le volume d’eau ait diminué au fil du temps à cause de l’évaporation. Une différence maximale de 0,5 ml est tout à fait normale. Si la différence entre le volume que vous avez ajouté et celui que vous avez retiré est supérieure à 0,5 ml, le ballonnet peut être endommagé et la sonde peut devoir être remplacée. Dans ce cas, procédez comme suit :</p><ul><li>Versez la quantité d’eau habituelle dans le ballonnet et vérifiez de nouveau trois à quatre heures plus tard.</li><li>Si la quantité d’eau n’a pas varié, l’évaporation peut simplement s’être produite plus vite que d’habitude. Remplissez de nouveau le ballonnet en versant la quantité d’eau habituelle et vérifiez toutes les trois à quatre heures plus tard pour vous assurer qu’il n’y a plus aucun problème.</li><li>Si la quantité d’eau est inférieure après ce délai, le ballonnet est probablement endommagé et vous devrez remplacer la sonde.</li><li>Si la quantité de liquides est supérieure après ce délai et qu’il semble que le contenu de l’estomac ou des aliments se retrouvent dans le ballonnet, ce dernier est définitivement défectueux et la sonde doit être remplacée.</li></ul><p>Si vous craignez que le ballonnet ne fonctionne pas comme prévu et que la sonde risque d’être retirée par accident, il convient de bien la fixer à l’aide de ruban adhésif en attendant qu’elle soit remplacée par vous ou l’expert des sondes G dont vous aurez eu soin de réserver les services en prenant rendez-vous pour qu’il vous aide à remplacer la sonde. En attendant, la sonde se trouvant toujours dans l’estomac, vous pouvez continuer à l’utiliser pour l’alimentation et l’administration de médicaments. Il n’y a pas lieu de vous présenter au service des urgences si le ballonnet est endommagé.</p><h2>Assortiment de rallonges pour l’alimentation prévues pour une sonde G à ballonnet de type discret</h2><p>L’orifice pour l’alimentation d’une sonde G à ballonnet de type discret, soit l’endroit par lequel les aliments sont introduits dans la sonde pour être ensuite dirigés vers l’estomac, comporte une valve unidirectionnelle qui empêche le contenu de l’estomac, les aliments, l’eau et les médicaments de refluer vers la sonde. Pour que la valve unidirectionnelle puisse laisser passer les aliments et administrer les médicaments, vous devez la brancher à un assortiment de rallonges prévues à cet effet qui varient selon la marque. Celle qui vous convient est fournie avec votre nouvelle sonde G à ballonnet de type discret. Au besoin, vous pouvez acheter des assortiments de rallonges séparément.</p><h3>Branchement de l’assortiment de rallonges à la sonde</h3><ol><li>Ouvrir l’emballage en plastique.</li><li>S’assurer que la pince sur la rallonge est en position fermée.</li><li>Faire correspondre la ligne indicatrice sur la rallonge à la ligne indicatrice sur la sonde et enfoncer la rallonge dans la valve.</li><li>La sonde étant en position, tourner la rallonge dans le sens des aiguilles d’une montre jusqu’à ce qu’elle soit bien en place. Une flèche figurant sur la rallonge indique dans quelle direction il faut tourner. </li><li>Fixer les différentes sondes pour l’alimentation, les liquides et les médicaments à l’orifice approprié et ouvrir la pince.</li><li>Une fois que la rallonge n’est plus utile, la rincer à grande eau et la retirer de la sonde.</li></ol><h3>Retrait de la rallonge raccordée à la sonde</h3><ol><li>S’assurer que la pince sur la rallonge est fermée.</li><li>Tout en gardant la sonde en place, tourner la rallonge dans le sens contraire des aiguilles d’une montre (du côté opposé à la flèche indiquée sur la rallonge).</li><li>Faire correspondre la ligne indicatrice sur la rallonge à celle de la sonde et retirer la rallonge.</li><li>Fermer le couvercle en plastique.</li></ol><p>L’assortiment de rallonges doit être remplacé tous les mois ou avant si vous remarquez que le plastique durcit ou que des aliments, des médicaments ou de la préparation lactée s’y accumulent. Il est important de le rincer à grande eau entre chaque utilisation et de le nettoyer au savon et à l’eau une fois par jour. Retirez la rallonge de la sonde lorsqu’elle n’est pas utilisée pour prévenir son retrait accidentel.</p> | <h2>Comment remplacer la sonde G à ballonnet</h2><h3>Fournitures</h3><ul><li>Nouvelle sonde G à ballonnet</li><li>Savon</li><li>Eau chaude</li><li>Débarbouillette </li><li>Eau stérile ou distillée</li><li>Quatre seringues à embout glissant de 5 ml</li><li>Lubrifiant à base d’eau ou hydrogel</li><li>Assortiment de rallonges pour l’alimentation (prévues pour les sondes G de type discret)</li><li>Bandelettes indicatrices de pH et guide de référence des couleurs</li></ul><h3>Procédure</h3><ol><li>Lavez-vous les mains à l’eau et au savon, et préparez l’équipement et les fournitures.</li><li>Soutirez le volume d’eau recommandé pour remplir le ballonnet de la sonde à l’aide d’une seule seringue. Avec une autre seringue, soutirez 5 ml d’eau pour bien rincer la sonde. Réservez les deux autres seringues vides (qui serviront à drainer la vieille eau du ballonnet et à vérifier le pH).</li><li>Préparez votre débarbouillette en savonnant et en humectant bien une moitié, mais en humectant l’autre moitié sans la savonner.</li><li>Vérifiez que le ballonnet de la nouvelle sonde G n’est pas endommagé en le remplissant de la nouvelle eau que vous avez soutirée. Pressez doucement sur le ballonnet pour vérifier les fuites possibles causées par des défauts. Retirez toute l’eau que contient le ballonnet avant de continuer.</li><li>Drainez l’eau stérile ou distillée du ballonnet de la vieille sonde G à l’aide de l’une des seringues vides. Jetez l’eau et la seringue.</li><li>Retirez l’ancienne sonde G. Il est normal que la partie intérieure de la sonde soit brune ou noire. Le contenu acide de l’estomac en est la cause. Jetez l’ancienne sonde.</li><li>Le moment est idéal pour évaluer la stomie en repérant tous les changements survenus comme la rougeur, la capacité de drainage, la présence d’une éruption cutanée ou d’un tissu de granulation. Nettoyez la stomie à l’eau et au savon et rincez-la à l’eau non savonneuse. Laissez-la sécher à l’air libre. </li><li>Lubrifiez l’extrémité de la nouvelle sonde G à ballonnet et introduisez-la dans la stomie en l’inclinant légèrement, en suivant le parcours existant. La sonde peut se légèrement résister et vous pouvez exercer raisonnablement une certaine force. Faites correspondre le mouvement d’insertion avec les inspirations que prend l’enfant, soit au moment où il se détend le plus.</li><li>Une fois la sonde en place, gonflez le ballonnet en injectant la quantité d’eau distillée ou stérile qui y est habituellement introduite. Retirez-la délicatement jusqu’à ce qu’une résistance se fasse sentir. Le ballonnet a alors atteint l’intérieur de la paroi de l’estomac.</li><li>Vérifiez la position de la sonde dans l’estomac en vérifiant le pH selon la méthode décrite ci dessous. Une fois que vous vous êtes assuré qu’elle se trouve bien dans l’estomac en ayant obtenu une lecture d’un pH égal ou inférieur à 6, rincez-la avec 5 ml d’eau. Si votre enfant est muni d’une sonde discrète, vous devrez utiliser l’assortiment de rallonges pour l’alimentation prévue pour rincer la sonde.</li><li>Si votre enfant n’est pas muni d’une sonde de type discret, ajustez le disque extérieur de manière à ce qu’il soit plaqué contre la peau.</li></ol><p>Vous pouvez maintenant utiliser la sonde pour l’alimentation et l’administration de médicaments.</p><h2>Vérification de l’emplacement de la nouvelle sonde à ballonnet</h2><p>Avant d’utiliser les nouvelles sondes pour l’alimentation et l’administration de médicaments, vous devrez vérifier que la sonde se trouve bien dans l’estomac en vérifiant le pH du contenu qui est retiré de la sonde.</p><h3>Comment vérifier le pH</h3><p>Vous aurez besoin des outils suivants :</p><ul><li>Une seringue à embout glissant vide</li><li>Un assortiment de rallonges pour l’alimentation convenant à une sonde G à ballonnet de type discret (uniquement les sondes discrètes)</li><li>Des bandelettes indicatrices de pH</li><li>Un guide de référence des couleurs du test de pH</li></ul><p>Instructions :</p><ol><li>Une fois la nouvelle sonde introduite, engagez la seringue vide dans l’assortiment de rallonges pour l’alimentation (qui convient à une sonde G à ballonnet de type discret) ou directement dans l’orifice de la sonde qui est prévu pour l’administration des médicaments (pour une sonde G à ballonnet de type non discret) et retirez une petite quantité du contenu de l’estomac. S’il est impossible de retirer un peu de ce contenu, faites rouler votre enfant sur un côté, puis sur l’autre ou demandez-lui de s’asseoir.</li><li>Videz le contenu de la seringue sur la bandelette indicatrice de pH.</li><li>Comparez les couleurs sur la bandelette de pH à celles du guide de référence.</li></ol><p>Si le pH est égal ou inférieur à 6, la sonde se trouve bien dans l’estomac et vous pouvez la rincer et l’utiliser pour l’alimentation et l’administration de médicaments.</p><p>Si le pH est supérieur à 6, la sonde peut ne pas se trouver dans l’estomac. Les médicaments et les aliments récemment ingérés peuvent modifier le pH. Si la lecture est élevée, n’utilisez pas la sonde pour alimenter ou administrer des médicaments et vérifiez le pH de nouveau une heure plus tard. Si la lecture est encore supérieure à 6, n’utilisez pas la sonde et communiquez avec votre expert des sondes G qui procédera à la vérification de sa position dans les locaux des services de radiologie interventionnelle.</p> | | | | <p>Pour obtenir de plus amples informations sur la sonde Mic-Key, consultez le site à l’adresse <a href="https://www.mic-key.com/">www.mic-key.com</a>.</p><p>Pour obtenir de plus amples informations sur la sonde AMT miniONE, consultez le site à l’adresse <a href="https://www.appliedmedical.net/enteral/minione/balloon/">www.appliedmedical.net/enteral/minione/balloon/</a>.</p> | | | | | |
Sondas G/G-Y: sondas G con globo | S | Sondas G/G-Y: sondas G con globo | G/GJ tubes: Balloon G tubes | | Spanish | Gastrointestinal;Other | Child (0-12 years);Teen (13-18 years) | Abdomen;Stomach | Digestive system | Procedures | Adult (19+)
Caregivers | NA | | 2019-10-25T04:00:00Z | | | | | | 6.50000000000000 | 75.3000000000000 | 2981.00000000000 | | Flat Content | Health A-Z | <p>Una sonda G con globo es un tipo de sonda de alimentación que tiene un globo en el extremo para ayudar a evitar que la sonda se extraiga accidentalmente. Aprenda cómo cuidar la sonda G con globo de su hijo y cambiarla en casa.</p> | <p>Las sondas de gastrostomía (sondas G) son dispositivos de alimentación que proporcionan nutrición líquida, medicamentos y otros fluidos directamente al estómago. Las sondas G se colocan a través de una abertura quirúrgica en la barriga (abdomen) de su hijo, llamada estoma. El túnel desde el exterior hacia el estómago se llama tracto.</p><p>Las sondas G con globo tienen un globo en el extremo dentro del estómago para mantener la sonda en su lugar. Estas sondas pueden ser de bajo perfil o no.</p> | <h2>Puntos clave</h2><ul><li>Una sonda G con globo es un tipo de sonda de alimentación que tiene un globo en el extremo dentro del estómago para evitar que se extraiga.</li><li>Una sonda G con globo de perfil no bajo se extiende más hacia fuera del estómago y tiene un disco en el exterior para evitar que la sonda se inserte demasiado dentro del estómago. Una sonda G con globo de perfil bajo se asienta cerca de la piel y es fácil de ocultar.</li><li>Las sondas G con globo deben cambiarse al menos cada seis u ocho meses para evitar que el globo tenga fugas o se rompa, lo que puede provocar que la sonda G se caiga accidentalmente.</li><li>El conjunto de extensión de alimentación de la sonda G debe cambiarse cada mes.</li><li>Siempre que cambie o vuelva a insertar una sonda G, antes de usarla para alimentos y medicamentos, verifique el pH de los líquidos que provienen de la sonda para asegurarse de que esté en el estómago.</li><li>No es necesario que vaya al departamento de emergencias si el globo de su hijo está roto, bloqueado o si la sonda se cae accidentalmente y usted reemplaza la sonda o inserta un catéter de Foley. Solo necesitará ir al departamento de emergencias si no puede insertar un catéter Foley de emergencia y no hay nada en el tracto.</li></ul> | | | | | | | | | | | | | | | | | | | | <h2>Recursos</h2><p>Para obtener más información sobre Mic-Key, visite <a href="https://www.mic-key.com/">www.mic-key.com</a>.</p><p>Para obtener más información sobre AMT miniONE, visite <a href="https://www.appliedmedical.net/enteral/minione/balloon/">www.appliedmedical.net/enteral/minione/balloon/</a>.</p> | | | | | |
G/GJ குழாய்கள் பலூன் G குழாய்கள் | G | G/GJ குழாய்கள் பலூன் G குழாய்கள் | G/GJ tubes: Balloon G tubes | | Tamil | Gastrointestinal;Other | Child (0-12 years);Teen (13-18 years) | Stomach;Abdomen | Digestive system | Procedures | Adult (19+)
Caregivers | NA | | 2019-10-25T04:00:00Z | | | | | | 6.50000000000000 | 75.3000000000000 | 2843.00000000000 | | Flat Content | Health A-Z | <p>பலூன் G குழாய் என்பது ஒரு வகை உணவூட்டல் குழாயாகும், குழாய் தற்செயலாக வெளியேற்றப்படுவதைத் தடுக்க உதவுமுகமாக இது முடிவிடத்தில் ஒரு பலூனைக் கொண்டிருக்கும். உங்கள் குழந்தையின் பலூன் G குழாயை எவ்வாறு பராமரிப்பது மற்றும் வீட்டில் வைத்து அதை எப்படி மாற்றுவது என்பன குறித்து அறிந்து கொள்ளவும்.</p> | <p>காஸ்ட்ரோஸ்டமி குழாய்கள் (G குழாய்கள்) என்பவை திரவ ஊட்டச்சத்து, மருந்துகள் மற்றும் பிற திரவங்களை நேரடியாக வயிற்றுக்குள் வழங்கும் சாதனங்கள் ஆகும். G குழாய்கள் உங்கள் குழந்தையின் வயிற்றில் (வயிறு) ஸ்டோமா எனப்படும் ஒரு அறுவைச் சிகிச்சைத் துளை மூலம் வைக்கப்படுகின்றன.</p><p>வெளியிலிருந்து இரைப்பைக்குள் செல்லும் ஒடுக்கமான வழியானது, பாதை என்று அழைக்கப்படுகிறது.</p><p>பலூன் G குழாய்கள், குழாயானது சரியான இடத்தில் இருப்பதற்காக வயிற்றினுள் உள்ள முனையில் ஒரு பலூனைக் கொண்டுள்ளன.இந்தக் குழாய்கள் நீளமான-முனை உள்ளவையாக அல்லது குறுகிய-முனை உள்ளவையாக இருக்கலாம்.</p> | <h2>முக்கிய குறிப்புகள்</h2><ul><li>பலூன் G குழாய் என்பது ஒரு வகை உணவூட்டல் குழாயாகும், குழாய் வெளியே இழுக்கப்படுவதைத் தடுப்பதற்காக வயிற்றுக்குள் இருக்கும் முனையில் இது ஒரு பலூனைக் கொண்டிருக்கும். </li><li>வயிற்றினுள் வெகுதூரம் உள்ளே செல்லாதிருப்பதற்காக ஒரு சிறுதட்டினைக் கொண்ட நீளமான-முனை உள்ள பலூன் G குழாய் வயிற்றுக்கு வெளியே நீட்டிய வண்ணமிருக்கும். </li> குறுகிய-முனை உள்ள பலூன் G குழாயானது, தோலுக்கு அருகில் இலகுவில் மறைக்கக் கூடிய வண்ணம் இருக்கும்.
<li>G குழாய் தற்செயலாக வெளியே வருவதற்குக் காரணமாகும் பலூன் கசிவினை அல்லது உடைப்பைத் தடுப்பதற்குக் குறைந்த பட்சம் ஒவ்வொரு ஆறு முதல் எட்டு மாதங்களுக்கு பலூன் G குழாய்களை மாற்ற வேண்டும்.
</li><li>G குழாயின் உணவூட்டும் இணைப்புத் தொகுதி ஒவ்வொரு மாதமும் மாற்றப்படல் வேண்டும்.</li><li>G குழாயை நீங்கள் மாற்றும் போது அல்லது மீண்டும் இணைக்கும் போது, எல்லா வேளைகளிலும், அதனை உணவூட்டல்களுக்கும் மருந்துகளுக்கும் பயன்படுத்துவதற்கு முன்பு, குழாயிலிருந்து வரும் திரவங்களின் pH ஐ எப்போதும் சரிபார்த்து, வயிற்றில் இருக்கும் அதன் அளவை உறுதி செய்து கொள்ளவும்.</li><li>உங்கள் குழந்தையின் வயிற்றிலுள்ள பலூன் உடைந்தால், அடைபட்டிருந்தால் அல்லது குழாய் தற்செயலாக விழுந்தால் நீங்கள் அவசர சிகிச்சைப் பிரிவுக்குச் செல்லத் தேவையில்லை. நீங்களே குழாயை மாற்றலாம் அல்லது ஃபோலே வடிகுழாயைச் செருகலாம். அவசரகால ஃபோலே வடிகுழாயைச் செருக முடியாவிட்டாலும் அந்த உணவுப் பாதையில் எதுவும் இல்லாத பட்சத்திலும் மட்டுமே, நீங்கள் அவசர சிகிச்சைப் பிரிவுக்குச் செல்ல வேண்டியிருக்கும்.</li></ul> | | | | | | | | | | | | | | | | | | | | <h2>வளங்கள்</h2><p>Mic-Key பற்றிய மேலதிகத் தகவலுக்கு,
<a href="https://www.mic-key.com/">www.mic-key.com</a> -ஐப் பார்வையிடவும்.</p><p>AMT miniONE பற்றிய மேலதிகத் தகவலுக்கு,<a href="https://www.appliedmedical.net/enteral/minione/balloon/">www.appliedmedical.net/enteral/minione/balloon/</a> -ஐப் பார்வையிடவும்.</p> | | | | | |