What is tracheal suctioning?
Tracheal suctioning clears your child’s airway and allows your child to breathe more easily. It is required when secretions (mucus) build up inside your child’s tracheostomy tube.
Why does my child’s tracheostomy tube need to be suctioned?
Mucus is produced by the lungs. In children without a tracheostomy tube, coughing brings the mucus up the trachea until it reaches the epiglottis. From there, the mucus can be coughed out of the mouth or swallowed into the esophagus, where it then passes through the digestive system.
A person with a tracheostomy tube cannot clear their own mucus. The mucus reaches their tracheostomy before it reaches their epiglottis, so it cannot be swallowed into the esophagus. As a result, it must be suctioned or coughed out through the tube.
When does my child need suctioning?
At a minimum, your child should have routine suctioning every day at the following times:
- when they wake up and before they go to sleep
- before meals
- before their tracheostomy tube is changed.
Your child will need additional tracheal suctioning if they cannot cough up mucus that may be blocking their tracheostomy tube. If your child is having difficulty clearing mucus on their own:
- their cough becomes more frequent or more congested than usual
- you can hear a gurgling sound as they are breathing
- you can see mucus in their tracheostomy tube
- their oxygen saturations drop
- they seem to be struggling to breathe (sucking in neck and chest muscles)
- their lips or extremities (fingers and toes) turn blue.
What type of suctioning can I perform?
There are three main types of tracheostomy tube suctioning, depending on your child’s needs.
- Tip suctioning allows you to remove mucus or fluids at the very front of the tracheostomy tube.
- Tube suctioning allows you to remove mucus or fluid from the full length of the tracheostomy tube, including just past the far end of the tube.
- Deep suctioning lets you remove mucus or fluid from your child’s airway beyond the tube. You should only perform deep suctioning if your child continues to have difficulty breathing after tube suctioning.
What equipment do I need?

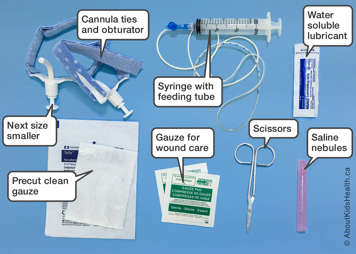
Tracheostomy kit
- Tracheostomy tube of the same size with ties attached and obturator
- One size smaller tracheostomy tube with ties attached and obturator (store in a small, well-labelled, clear bag)
- Normal saline nebules
- Water soluble lubricant
- Extra inner cannula, if needed
- Round ended-scissors
- Pre-cut clean tracheostomy gauze (dressing)
- Manual suction device: 20 mL syringe with feeding tube attached (in case the suction machine does not work)

Additional equipment and supplies
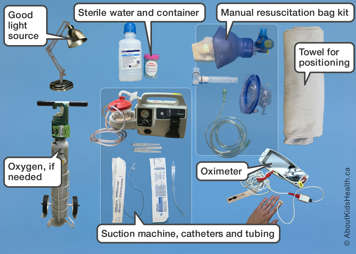
- Suction machine and adjuncts (Yankauer stick handle or tip adaptor)
- Disposable suction catheters and suction tubing
- Sterile, distilled water
- Clean container for flushing solution
- Clean disposable gloves (to avoid direct contact with secretions or organisms from your child; sterile gloves are not needed)
- Good light source
- Oximeter and probes
- Manual resuscitation bag with tracheostomy adaptor and the appropriately sized mask
- Oxygen, if needed
- Plastic bag
How deeply to suction your child’s tracheostomy tube
Your child’s health-care provider will review with you what type of tube and suction catheter your child needs, how deeply to insert the suction catheter and which setting to use for the suction machine.
| Tracheostomy tube size: | |
| Suction catheter size: | |
| Depth of suction catheter insertion for tube suction: | |
| Suction machine setting: |
Tip suctioning
Gather your equipment and supplies.
-

Make sure the oximeter is on and providing an accurate reading.
Have oxygen available.
-

Make sure the suction machine is at the correct setting.
-

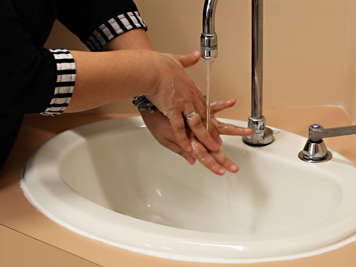
Wash your hands well.
-

Fill a clean container with sterile, distilled water or saline.
-

Make sure your child is in a comfortable position. If your child wears an HME, a tracheostomy cap, a speaking valve or a mask, remove it.
Put on clean gloves.
-

Attach the suction tubing to a clean tip adaptor or “little sucker”. Keep the tip adaptor in clean casing until just before use. Do not touch the end of the adaptor that goes into the tracheostomy tube.
-

Use the tip adaptor at the front of the tracheostomy tube to remove any mucus your child has coughed up. The tip adaptor should not block the entire inner cannula. Only use it for up to 10 seconds at a time.
-

If there is a thumb port on the tip, cover it during suctioning.
Rinse the tip adaptor and tubing by dipping the adaptor into sterile water or saline and suctioning.
-

If there is a cover, replace it on the tip adaptor.
-

Assess and tend to your child’s respiratory status and oxygen needs. Replace your child's HME, tracheostomy cap, speaking valve or mask, if they use one.
-

Turn off the suction unit.
Empty and clean the suction drainage bottles and containers, if needed.
-

Wash hands well.
Prepare the suction equipment and supplies for the next use.
Tube suctioning
Gather your equipment and supplies.
-

Make sure the oximeter is on and providing an accurate reading.
Have oxygen available.
-

Make sure the suction machine is at the correct setting.
-

Wash your hands well.
-

Fill a clean container with sterile water or saline.
-

Make sure your child is in a comfortable position (lying or sitting down).
-

Open the catheter by pushing the base through the paper packaging.
-

Attach the suction tubing to the correct size suction catheter.
-

Slowly withdraw the catheter from the package just before use. Hold it four to six inches from the end. Do not touch the end of the catheter that goes into the tracheostomy tube. Place the catheter inside the packaging until you use it.
Remove the ventilator, tracheostomy cap, HME, mask or speaking valve from the tracheostomy tube, if your child uses one. If necessary, manually ventilate your child with the manual resuscitation bag.
-

Suction a small amount of sterile water or saline through the suction catheter to wet it and make it easier to insert.
-

Insert the suction catheter into the tracheostomy tube to the length instructed by your healthcare team. Make sure your thumb is not touching the suction control port.
-

Hold your thumb over the suction control port.
-

Slowly remove the suction catheter while “twirling” it between your fingers to remove mucus (10 seconds maximum).
-

Clear the suction catheter by dipping it in the sterile water and suctioning.
Give your child a break of 30 to 60 seconds before repeating tube suctioning. Give your child some big breaths using the manual resuscitation bag if needed. If your child's oxygen levels drop, use oxygen as prescribed by your child’s healthcare team.
When done, replace the tracheostomy cap, HME, speaking valve or ventilator, if your child uses one.
-

Assess and tend to your child’s respiratory status and oxygen needs.
Once you are finished, discard the catheter and replace the tip adaptor on the suction tubing.
-

Turn off the suction unit.
Empty and clean the suction drainage bottles and containers, if needed.
-

Wash hands well.
Prepare the suction equipment and supplies for the next use.
Deep suctioning
Gather your equipment and supplies.
-

Make sure the oximeter is on and providing an accurate reading.
Have oxygen available.
-

Make sure the suction machine is at the correct setting.
-

Wash your hands well.
-

Fill a clean container with sterile, distilled water or saline.
-

Make sure your child is in a comfortable position (lying or sitting down).
Put on clean gloves.
-

Open the catheter by pushing the base through the paper packaging.
-

Attach the suction tubing to the correct size suction catheter.
-

Slowly withdraw the catheter from the package just before use. Hold it four to six inches from the end.
-

Do not touch the end of the catheter that goes into the tracheostomy tube. Keep the catheter inside the packaging until you use it.
If your child wears an HME, a tracheostomy cap, a speaking valve or a mask, remove it from the trach tube. If necessary, manually ventilate your child with the manual resuscitation bag.
-

Suction a small amount of sterile water or saline through the suction catheter to lubricate it.
-

Gently insert the suction catheter into the tracheostomy tube with your thumb off the suction control port.
-

Once you meet resistance or your child starts to cough, pull the suction catheter back a small amount. Apply suction by holding your thumb over the suction control port.
-

Slowly remove the suction catheter while “twirling” it between your fingers to remove mucus (10 seconds max).
-

Clear the suction catheter by dipping it in the sterile water or saline and suctioning.
Give your child a break of 30 to 60 seconds before repeating deep suctioning. Give your child some big breaths using the manual resuscitation bag if needed. If your child's oxygen levels drop, use oxygen as prescribed by your child’s healthcare team.
Once you are finished, replace the tracheostomy cap, HME, speaking valve or ventilator, if your child uses one.
-

Assess and tend to your child’s respiratory status and oxygen needs.
Discard the catheter and replace the tip adaptor onto the suction tubing.
-

Turn off the suction unit.
Empty and clean the suction drainage bottles and containers, if needed.
-

Wash hands well.
Prepare the suction equipment and supplies for the next use.
Precaution
Only perform deep suctioning if your child continues to have difficulty breathing after tube suctioning.
What should I do if my child still has mucus after deep suctioning?
If you are unable to remove the secretions from your child’s tracheostomy tube and your child is having serious breathing difficulties, change your child’s tracheostomy tube. It is important to know how to respond in an emergency inside or outside the home.
What should I do if I cannot insert the suction catheter into the tracheotomy tube?
If you are unable to insert the suction catheter, perform an emergency tracheostomy tube change.
