What is bladder irrigation?
Bladder irrigation is a procedure used to gently flush the bladder using a salt-water mixture called normal saline. This is a procedure that may be recommended by your child’s urology health-care team. The normal saline is pushed through a thin tube called a urinary catheter that enters your child’s bladder through their urethra. The solution is then pulled back through the syringe and discarded. This is repeated until the urine in the syringe comes back clear.

Bladder irrigation may be recommended to:
- help clear mucus or debris from the bladder
- ensure good urine drainage through the catheter
- prevent catheter blockage.
This procedure is often done at home after you have been taught by your child’s health-care team. Your child's health-care team will let you know how often to irrigate the bladder and with how much saline.
What supplies do I need?
You will need the following supplies each time you irrigate your child's catheter:
- Normal saline (0.9% saline)
- A sterile container
- Two to three 50 mL catheter-tip syringes
- Alcohol wipes
- Catheter drainage bag (optional)
- Supplies needed to insert an intermittent (male anatomy/female anatomy) or indwelling urinary catheter

Can I buy or make normal saline solution?
It is recommended that you use 0.9% normal saline for the purpose of bladder irrigations. You can purchase medical grade normal saline or make your own at home.
Medical grade
- You can purchase medical grade normal saline from a pharmacy.
- To keep sterile, bottles should be one-time use only.
Homemade
- You can make normal saline using table salt and boiled or distilled water.
- Store in the fridge for one day if made with boiled water.
- Store in the fridge for one month if made with distilled water.
- Store in the fridge for one day if made with boiled water.
How to make a saline solution at home
Saline solution is easy to make at home. Always wash your hands with soap and water before preparing saline at home.
You will need:
- one clean, air-tight glass bottle or jar with lid
- pot with lid
- water
- table salt
Instructions
Making a small-volume batch:
- Put 1 cup (250 mL) of tap water into a pot and boil for 15 minutes with the lid on.
- Remove from heat and cool until the water reaches room temperature.
- Add ½ teaspoon of salt into the pot and stir to dissolve.
- Carefully pour the salt-water solution from the pot into the jar or bottle and put the lid on.
- Refrigerate solution and use within 24 hours.
Making a large-volume batch:
Option 1 (boiling water)
- Put 4 cups (1 L) of tap water into a pot and boil for 15 minutes with the lid on.
- Remove from heat and cool until the water reaches room temperature.
- Add 2 teaspoons of salt into the pot and stir to dissolve.
- Carefully pour the solution from the pot into the jar or bottle and put the lid on.
- Refrigerate solution and use within 24 hours.
Option #2 (distilled water)
You can used distilled water purchased from most pharmacies and grocery stores to make sterile and longer-lasting saline without boiling water. This is an easy and less time-consuming process.
- Mix 8 teaspoons of salt into 4 L of distilled water.
- Refrigerate solution and use within one month.
Aseptic non-touch technique (ANTT)
The aseptic non-touch technique (ANTT) is used for bladder irrigation. This technique will help to prevent introducing germs, which may cause or worsen an infection in the bladder.
To prevent germs from entering your child’s bladder, key parts and key sites need to be cleaned properly and not touched. Key parts include the tips of syringes and the end of the catheter drainage bag. Key sites include the end of the urinary catheter where the urine exists the bladder. It is important to keep these areas and the overall work environment clean. Use wipeable surfaces to place irrigation supplies and scrub the end of the catheter with an alcohol wipe for 15 seconds and let dry for 15 seconds before attaching anything to the catheter. It is strongly recommended to have two caregivers present to maintain ANTT during bladder installation.
Preparing supplies for the irrigation
- Wash your hands and gather the supplies you will need on a clean work surface.
- Measure out the required amount of 0.9% normal saline that you will need for irrigation into a sterile container.
-
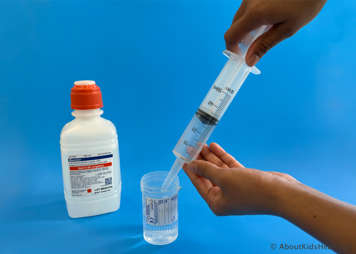
Draw up the normal saline from the sterile container into the first catheter tip syringe. Do not let the tip of the syringe touch anything else.
- Remove air from the catheter tip syringe by tapping the side of the syringe with your finger and gently pushing the air bubbles back into the container with the plunger. Replace the cap on the syringe.
- Repeat steps 2-4 to prepare a second syringe of normal saline (same volume).

Emptying your child’s bladder
Your child’s bladder needs to be empty before starting irrigation.
Option 1
Empty your child’s bladder via clean intermittent catheterization (male anatomy/female anatomy), then leave the catheter in place. You can tape the catheter to your child’s leg to secure it.
Option 2
- Empty your child’s bladder with an indwelling catheter.
- Put a clean towel under the catheter where it connects to the drainage bag.
- Clean the connection site with an alcohol wipe, then detach the collection bag from the drainage port. Discard the drainage bag or secure the end with a cap if you plan to reattach the drainage bag.
Performing bladder irrigation
After you have prepared your supplies and emptied your child’s bladder, you can begin to irrigate your child’s bladder.
- Pinch the end of the catheter between your thumb and forefinger and clean the tip with an alcohol wipe for 15 seconds. Let dry for 15 seconds.
-
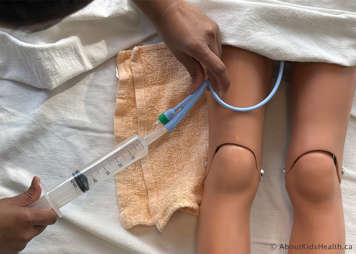
Remove the cap from the syringe of normal saline, then attach the syringe to the end of the catheter.
-
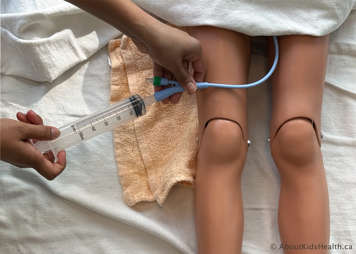
Gently push the plunger so all the normal saline flows through the catheter.
-

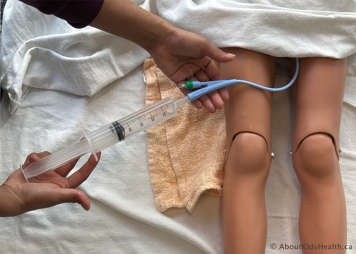
Once the normal saline is all in, gently pull back on the syringe plunger to take it back out. Inspect the output. You may see mucous or sediments in the syringe. You may get more output than what you put in.
- If the output is not clear/has sediments in it:
- Pinch the end of the catheter and remove the first syringe.
- Swab the end of the catheter with an alcohol wipe for 15 seconds and let dry for 15 seconds.
- Attach the second syringe of normal saline to the catheter and repeat the push/pull action (Step 3 and 4).
- If the output is still not clear, keep the second syringe attached while you empty the first syringe into the sink or garbage. Refill the first syringe with the required amount of new normal saline.
- Disconnect the second syringe. Pinch the catheter end and swab it for 15 seconds with an alcohol wipe, then let it dry for 15 seconds.
- Attach the first syringe. Repeat the push/pull action.
- Pinch the end of the catheter and remove the first syringe.
- Once output is clear, pinch the catheter and remove the syringe.
- Remove the catheter, or
- If you are reconnecting to a drainage bag, clean the end of the catheter and the tip of the drainage bag tubing with an alcohol wipe before connecting them (scrub for 15 seconds, then let dry for 15 seconds).
- Remove the catheter, or


Can I reuse any of the supplies?
Urinary catheters and alcohol wipes are single use items only. This is to limit the risk of recurrent urinary tract infections (UTIs).
The standard of practice is to discard catheters after one use. Sterilizing and re-using catheters is not recommended. It can significantly increase a child’s risk of urinary tract infection. If you choose to reuse catheters, please discuss ways of reducing the risk to your child with the health-care team.
Normal saline made at home can be kept in the fridge for one day or one month, depending on how it was prepared. Ensure the lid is closed before storing. Be careful not to contaminate the container by touching or putting anything inside. Normal saline should be poured out of the container, not scooped or ladled out.
Catheter caps, specimen containers and catheter tip syringes can be sterilized and re-used for up to seven days.
Cleaning catheter caps, catheter tip syringes and containers
Catheter caps, catheter tip syringes and specimen containers should be cleaned immediately after use.
- Just after using the supplies, take the syringe pieces apart and wash all the items with warm water and dish soap. Rinse thoroughly two times.
- Dry with paper towel and store in a plastic bag. Sterilize them later that day as outlined below.
Sterilizing catheter caps, catheter tip syringes and containers
- Soak containers and syringes in a clean basin of room temperature water with 1 cup of vinegar for about 30 minutes.
- Rinse containers and syringes with distilled water.
- You can boil water and have it return to room temperature before using, or you can use bottled distilled water to rinse the containers. Do not use boiling hot water on these items.
- You can boil water and have it return to room temperature before using, or you can use bottled distilled water to rinse the containers. Do not use boiling hot water on these items.
- Put the items on a clean paper towel to air dry completely. Once completely dry, store the items in a clean zip-lock plastic bag.
What to do if it is hard to pull back on the plunger
If you are finding it difficult to pull back on the syringe plunger, try the following tips:
- Pull back slowly and gently. Do not use force.
- Reposition your child and try again.
- The catheter may have slipped out. Ensure the catheter is all the way inside the bladder and try again.
- Adjust the position of the catheter and inject more normal saline, then pull back on the plunger gently.
- Ask your child’s health-care team what your child’s expected bladder capacity is. Do not exceed this total volume.
- Ask your child’s health-care team what your child’s expected bladder capacity is. Do not exceed this total volume.
What if the amount of normal saline coming out is LESS than what I pushed in?
- Reposition your child and try again.
- If you are not pulling back at least 75% of the original normal saline volume, the catheter may be blocked. Consider changing the catheter, if you are able to and directed to do so by the health-care team.
- Connect the catheter to a drainage bag to allow the normal saline to drain.
- Contact your child’s health-care team or go to the Emergency Department if the catheter drains very minimal urine or no urine for the next few hours, or the bladder area looks distended or enlarged.
Will my child receive home care after discharge?
Your child’s health-care team may submit a referral for home care nursing if there is an anticipated need to support your child’s care at home. This is usually a temporary service. A hospital care coordinator will review the referral to determine if home care services are an option for your child and may contact you for more information. They will work with your local home care office to coordinate services and supplies if appropriate.
How can I make my child more comfortable?
- Have your child sitting down during procedure.
- Instilling cold solution can cause painful bladder spasms. Bring the normal saline to room temperature before using it. Run the sealed container under tap water or leave the container out to warm to room temperature.
- Push the syringe of normal saline slowly to prevent bladder spasms.
When to contact your child’s health-care team
Contact your child’s health-care team if:
- your child has a fever greater than 38˚C or 100.4˚F
- the catheter is accidentally removed and you have not been taught how to reinsert it or you have been instructed not to reinsert it
- your child has worsening bladder distension or urinary retention
- there is blood in your child’s urine, especially bright red clots or it is the colour of tomato soup (dark red and not see through)
- irrigation is consistently painful for your child
- there is little to no urine output after normal saline irrigation
- you were directed to irrigate your child’s bladder but are unsure of how to proceed.
At SickKids
Supplies
Supplies may be purchased from the following places:
- The SickKids Specialty Food Shop
- CathetersPLUS (Real Life Medical)
- Wellwise by Shoppers Drug Mart
- Coloplast Canada
- Your local medical supply store
Your child’s health-care team can help you choose the right supplies and can provide you with a prescription for your child’s supplies to submit to private insurance for coverage.