By the end of this chapter, you will be able to:
- describe what mechanical in-exsufflation (CoughAssist) is and why it is used
- demonstrate how to perform mechanical in-exsufflation (CoughAssist) for a child with a tracheostomy tube

A CoughAssist machine mimics a strong cough to help your child clear their lungs and reduce the risk of lung infections. CoughAssist delivers pressurized air when your child breathes in, then rapidly switches to a negative pressure to suck the air out of the lungs. This causes your child to cough.
Who will benefit from using CoughAssist?
Your child may benefit from CoughAssist if:
- they have a weak cough and are unable to perform LVR
- they have difficulty clearing secretions
- their lungs have collapsed due to secretions or plugs
Who should not use CoughAssist?
CoughAssist is not suitable if your child:
- has untreated tension pneumothorax (injury to the lung or chest wall that allows air into the pleural space, which is the space around the lung, but does not allow air out of it)
- has active bleeding in the lungs
- has a suspected or confirmed head injury and/or c-spine (neck) injury
- has an unrepaired tracheoesophageal fistula (abnormal connection between the esophagus and the trachea)
- has uncontrolled asthma or bronchospasm
CoughAssist may not be suitable if your child:
- has a history of bullous emphysema (air- or fluid-filled cavities in the lungs)
- is susceptible to pneumothorax (collapsed lung) or pneumomediastinum (air accumulation in the upper chest between the lungs)
- has had any recent barotrauma (injury caused by changes to air or water pressure)
- has certain heart conditions (for example has a single ventricle or Fontan circulation), unless it is approved by their cardiologist
- has increased intracranial pressure (build-up of pressure in the brain), unless it is approved by their neurosurgeon
- has a burn, open wound, infection or skin graft on the thorax
- has recently received a transvenous pacemaker or subcutaneous pacemaker
- has suspected tuberculosis
- has had a lobectomy/pneumonectomy or other chest surgeries in the past six weeks
You will receive training from your health-care team on how to safely perform CoughAssist therapy on your child. Do not perform therapy without receiving instructions.
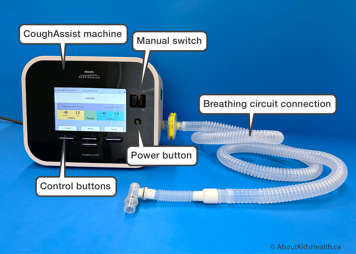
What are the parts of the CoughAssist machine?

The CoughAssist machine features:
- power on/power off button
- control buttons to perform certain actions
- a manual switch to activate the insufflation (air-in) and exsufflation (air-out) phases
- display screen
- breathing circuit connection
How do I use CoughAssist with my child?
Before you start
- Ensure your child has not eaten for at least one hour before treatment.
Gather your equipment:
- CoughAssist machine
- bacteria filter
- flexible tubing
- 15mm connector
- tracheostomy adaptor
- oxygen saturation monitor (oximeter)
- suction machine
- emergency tracheostomy kit
- oxygen if your child is prescribed it
- manual resuscitation bag

-

Check that the suction machine is working, charged, set to the appropriate pressures and ready to go.
-

Suction your child's tracheostomy tube.
-

Use the oximeter to make sure your child's oxygen saturation level is within their target range.


Using CoughAssist in Auto mode
-

Have your child sit comfortably, or lie down in bed, with good head and neck support.
-

Assemble the circuit. Ensure the outlet filter, tubing, 15mm connector and tracheostomy adaptor are all connected properly.
-

Turn on the CoughAssist machine. It will start in Standby mode.
-

Check that the settings on the CoughAssist are set as prescribed by your health-care team.
-

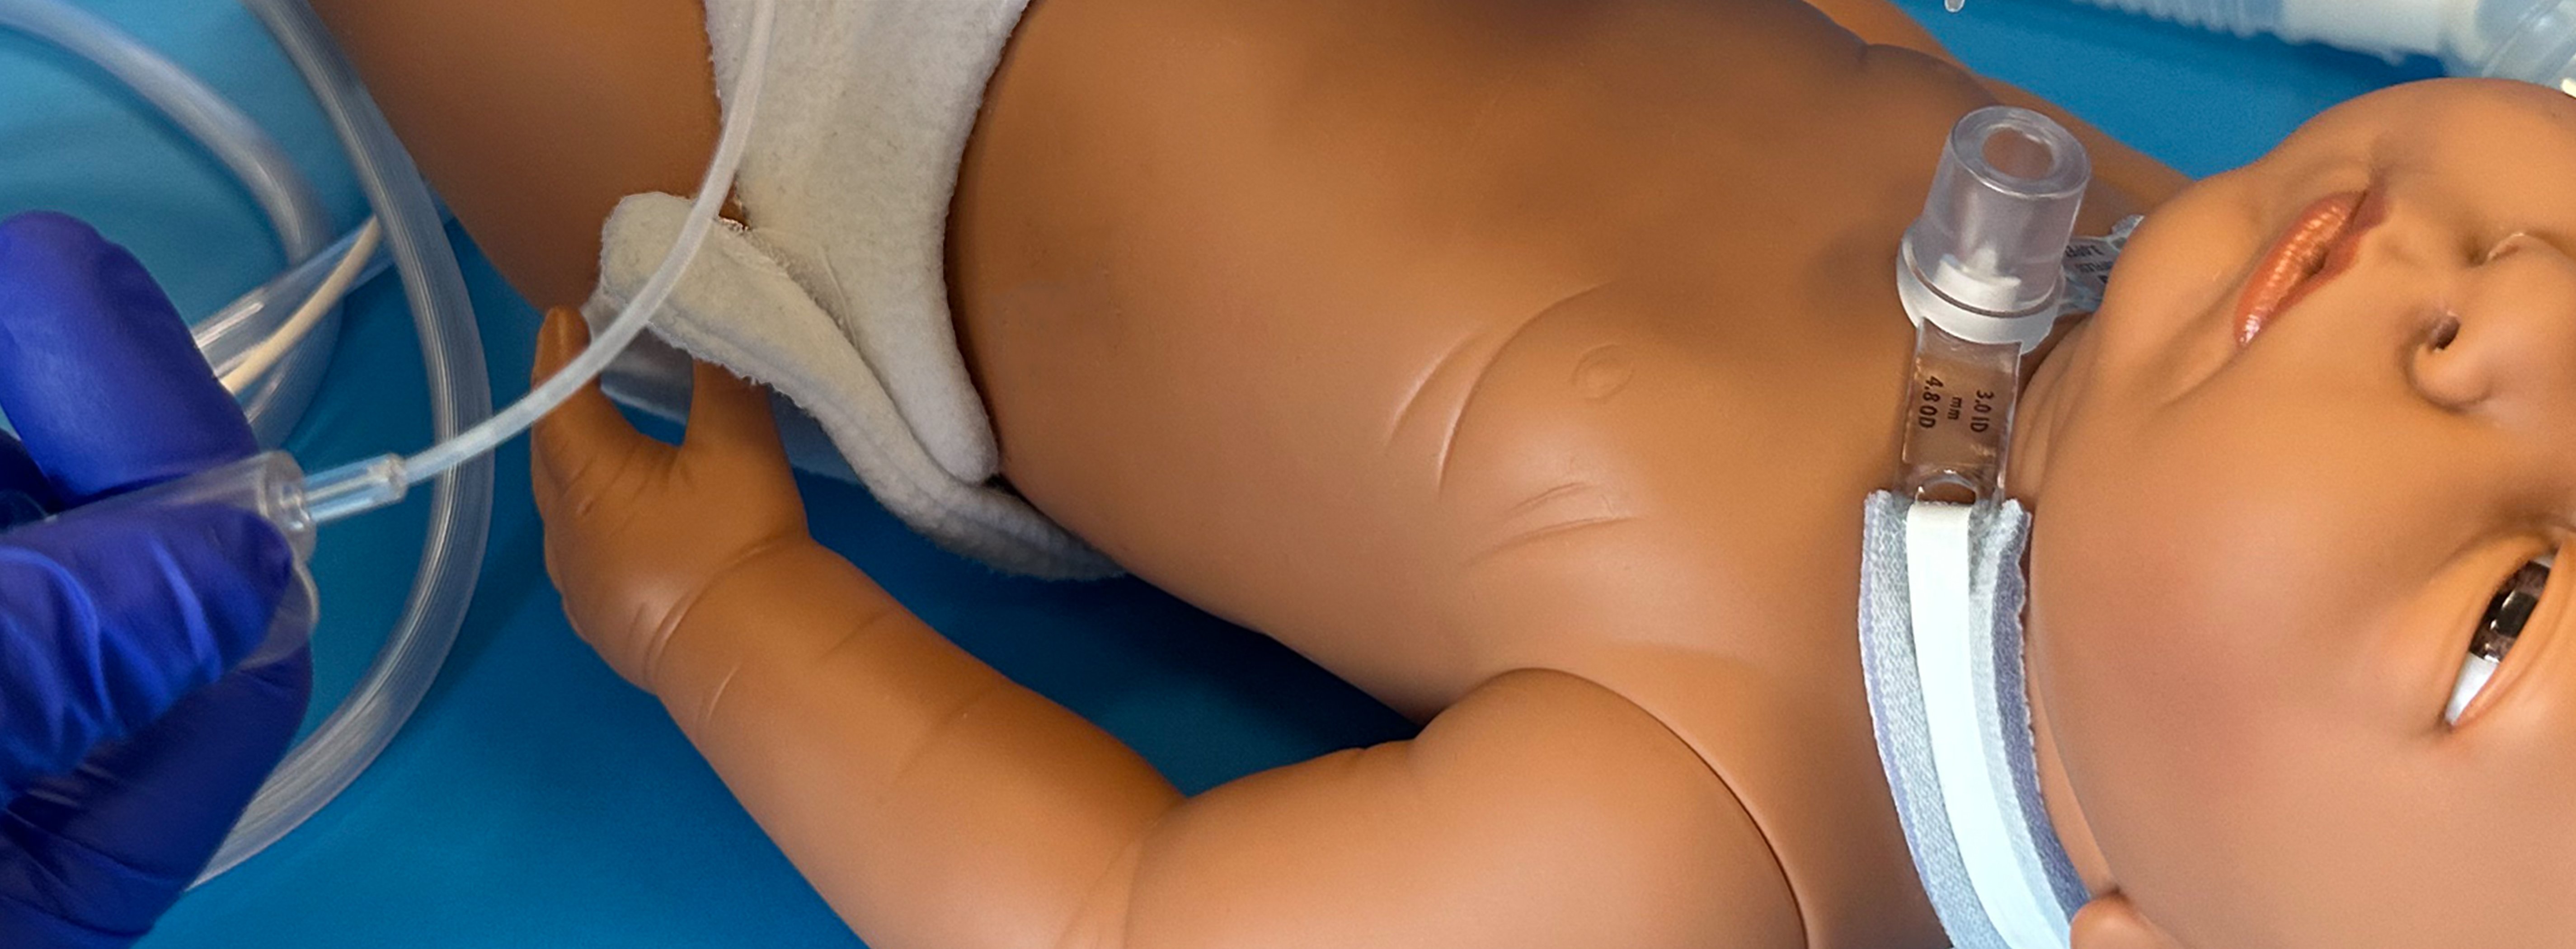
Connect the tracheostomy adaptor to your child.
-

Press the therapy button to begin the treatment.
-

Watch the screen that indicates the inhale phase. Coach your child through the inhale phase using verbal cues.
-

The screen will then switch to show the exhale phase. Watch the screen that indicates the exhale phase. Coach your child through the exhale phase using verbal cues.
- Depending on your child’s settings, they may then go into a Pause setting for a brief time before the next cough (inhale part) starts again.
- Steps 7 and 8 are one cycle. Do at least three cycles, or the number of cycles prescribed by your health-care team.
-


If your child needs to be suctioned, remove the tracheostomy adaptor and suction them. Wait at least 30 seconds. It is good practice to remove the tracheostomy adaptor and suction after each set.
- Reattach the adaptor and continue the next set of coughs.
- Three cycles (steps 7-8, three times) equal one set. Complete three sets, or the number of sets prescribed by your child's health-care team.
- Remove the tracheostomy adaptor and suction your child as needed.


It is recommended that you do a minimum of two treatments a day; more when your child is sick. Please follow the recommendations from your child’s health-care team.
To use CoughAssist in Auto mode, complete the steps above without adjusting the lever. The machine will be set to run the cycles. Count the cycles to make sure you are giving your child the correct treatment as prescribed by your health-care team.
Using CoughAssist in Manual mode
- Have your child sit comfortably, or lie down in bed, with good head and neck support.
Assemble the circuit. Ensure the outlet filter, tubing, 15mm connector and tracheostomy adapter are all connected properly.
-

Turn on the CoughAssist machine. It will be in Standby mode.
-

Check that the settings on the CoughAssist are set as prescribed by your health-care team.
-

Connect the tracheostomy adaptor to your child.
-

Press the therapy button to begin the treatment.
-

Move the lever to the INHALE side and hold for the prescribed time.
-

Quickly switch the lever to the EXHALE side and hold for the prescribed time.
- Pause briefly after the exhale time is done before starting the next cough (as needed).
- Steps 7 and 8 are one cycle. Do at least three cycles, or the number of cycles prescribed by your health-care team.
-


If your child needs to be suctioned, remove the tracheostomy adaptor and suction them. Wait at least 30 seconds.
- Reattach the adaptor and continue the next set of coughs.
- Three cycles (steps 7-8, three times) equal one set. Complete three sets, or the number of sets prescribed by your child's health-care team.
- Remove the tracheostomy adaptor and suction your child as needed.
- It is recommended that you do two CoughAssist treatments a day; more when your child is sick.


Precautions
- Always use CoughAssist at least one hour after your child’s last feed or meal.
- Do not use CoughAssist if your child:
- has a headache
- is vomiting
- experiences aspiration (for example has accidentally inhaled food)
- has lots of air in their stomach
- has low oxygen saturation levels without quick recovery
- has a bronchospasm
- has an irregular heart beat
- feels pain in the ribs or spine
- is breathing too slow or too fast.
Your health-care team will review these CoughAssist precautions with you.
How can I help my child get used to CoughAssist?
Your child will need some time to become familiar with the sounds of the CoughAssist machine. Let them play with the equipment and push the buttons so they can hear the sounds.
When your child is comfortable with the sounds, let them try one assisted breath. Be patient. It will take some time for them to be comfortable using the machine.
How do I clean and maintain the CoughAssist machine?
After every use
- Wipe the external surface with a damp cloth.
Weekly
- Wash the breathing hose and tracheostomy connector with a solution of mild liquid soap and water. Rinse thoroughly. Allow parts to air dry completely before using them again.
- Inspect the antibacterial outlet filter and replace it if visibly soiled.
Every two weeks
- Wash the air inlet filter in warm water with a solution of mild liquid soap and water. Rinse thoroughly. Allow the filter to air dry completely.
- Replace the bacterial filter. Do not clean it.
Every six months
- Replace the air inlet filter.
As needed
- Replace the tubing if there are any tears, discoloration, worn out.
- Replace connectors as needed.
VEP CoughAssist resources
Use and Care of your Philips CoughAssist E70
https://www.youtube.com/watch?v=CaEyb7Kn9uA
CoughAssist E70 Cleaning Guide
https://ontvep.ca/wp-content/uploads/2022/03/Cleaning-guide.pdf
Philips CoughAssist E70
https://ontvep.ca/philips-coughassist-e70/
| Settings | Explanation of settings |
|---|---|
| Preset | Allows you to see which predefined (or preset) prescription is being used. Your child may have just one prescription set or up to 3 depending on their needs. |
| Mode | Auto: delivers therapy based on the settings set below by your child’s healthcare team. Most widely used mode. Manual: delivers therapy best on the amount of time the toggle switch is held on either Inhale or Exhale. |
| Cough-Trak | A feature that allows your child to trigger and synchronize the device to provide the cough sequence. If your child can trigger during assessment, this feature will be turned On. Otherwise, it will be kept off. If it is off, then the machine will give the cough sequence for the times that are set. The health-care team will teach you more about this during training on the device. |
| Inhale Pressure | This is the pressure your child receives while in the inhale phase. |
| Inhale Flow | This is a comfort feature that allows you to control how rapidly the patient receives the inhale therapy delivered to them. |
| Inhale Time | This time indicates how long your child spends in the inhale phase when in the Auto mode. This setting is not available if the mode is set to Manual. |
| Exhale Pressure | This is the pressure your child receives while in the exhale phase. |
| Exhale Time | This time indicates how long your child spends in the exhale phase when in the Auto mode. This setting is not available if the mode is set to Manual. |
| Pause Time | This setting allows for a pause after exhale phase and before the next inhale phase. This setting is not available when in the Manual mode or when Cough-Trak is enable in Auto mode. |
| Oscillation | This feature delivers oscillations to the air during inhale only, exhale only or both inhale and exhale. This feature enhances mobilization of secretions. When this feature is set to On, your health-care provider will set a Frequency and Amplitude setting to determine the level of oscillations required and most comfortable for your child. |